Pre-Requisites
Install Requirements
This is specific to Self Hosted deployments. For Sath hosted connectors, these requirements are already in place.
- You need to install Helm version 3 or above.
- You can use Kubernetes cluster (1.26 or above) to install the connector
Supported Managed Systems
Currently the AD connector supports the following Active Directory Domain Services (AD DS) functional levels:
Microsoft Windows Server 2016
Microsoft Windows Server 2012 R2
Microsoft Windows Server 2012
Microsoft Windows Server 2008 R2
Connection Requirements
Below is needed to connect to Microsoft AD
- Microsoft AD Service Account
- Microsoft AD Application credentials
- baseDN
- Search Base
- userPrincipalName of Service account.
- Service Account Password
- IP Address of AD Server
- Port
Create a Service Account
Create a Microsoft Active Directory service account with the required permissions for IDHub integration. A service account in Active Directory is a special user account created specifically for running a particular service or application, such as IDHub, on the Windows operating system. IDHub uses this service account to perform actions on the user's behalf within Active Directory, facilitating secure authentication, access management, and seamless integration between IDHub and Active Directory.
Below steps assumes that you are already logged into your AD server as an Administrator.
1. Open Active Directory Users and Computers
- Press
Win + R, typedsa.msc, and press Enter, or navigate through Control Panel > Administrative Tools > Active Directory Users and Computers.
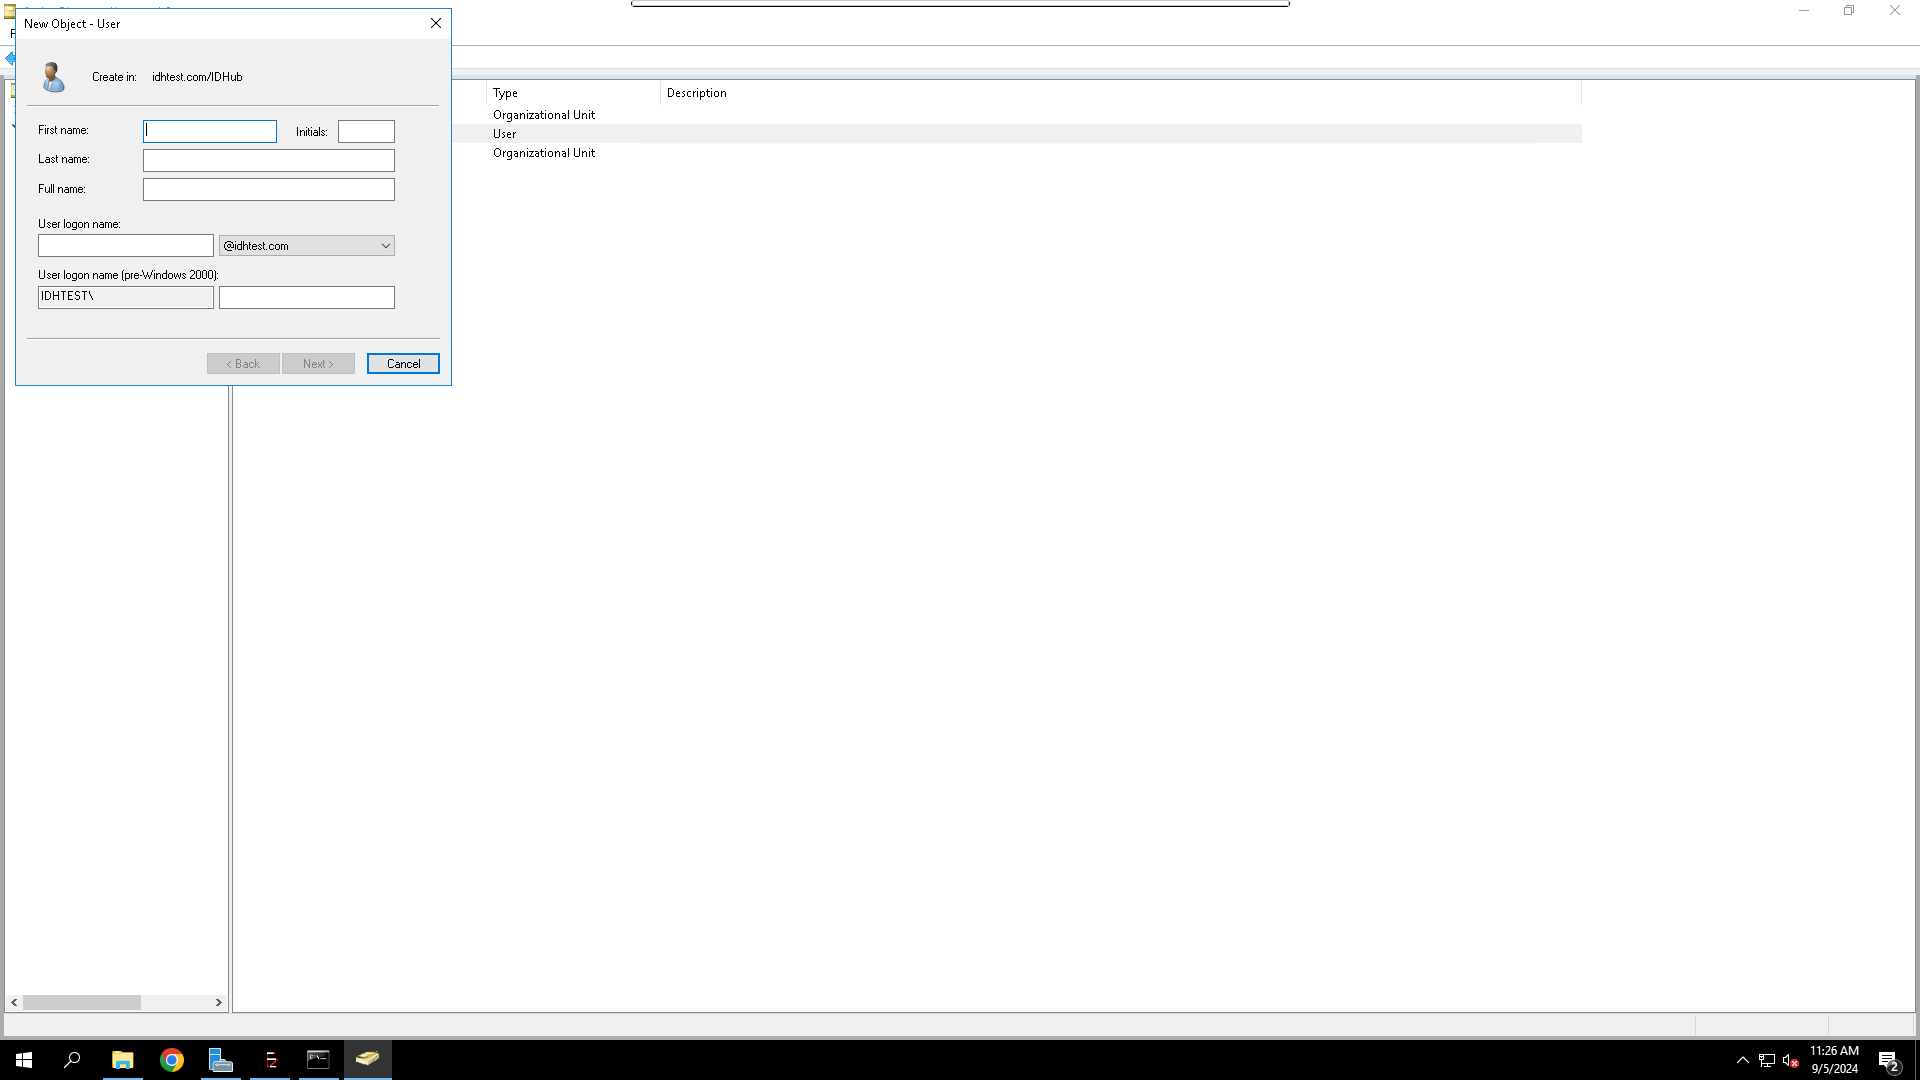
2. Create a New User Account
- In the Active Directory Users and Computers console, right-click on the Users container, then select New > User.
3. Configure the Service Account Properties
- Name the Service Account:
- Fill in the
First Name,Last Name(optional), andUser Logon Namefields. For a service account, it’s common to use a naming convention likesvc_idhubor similar for easy identification.
- Fill in the
- Click Next.
4. Set the Password for the Service Account
- Set a strong password and uncheck
User must change password at next login
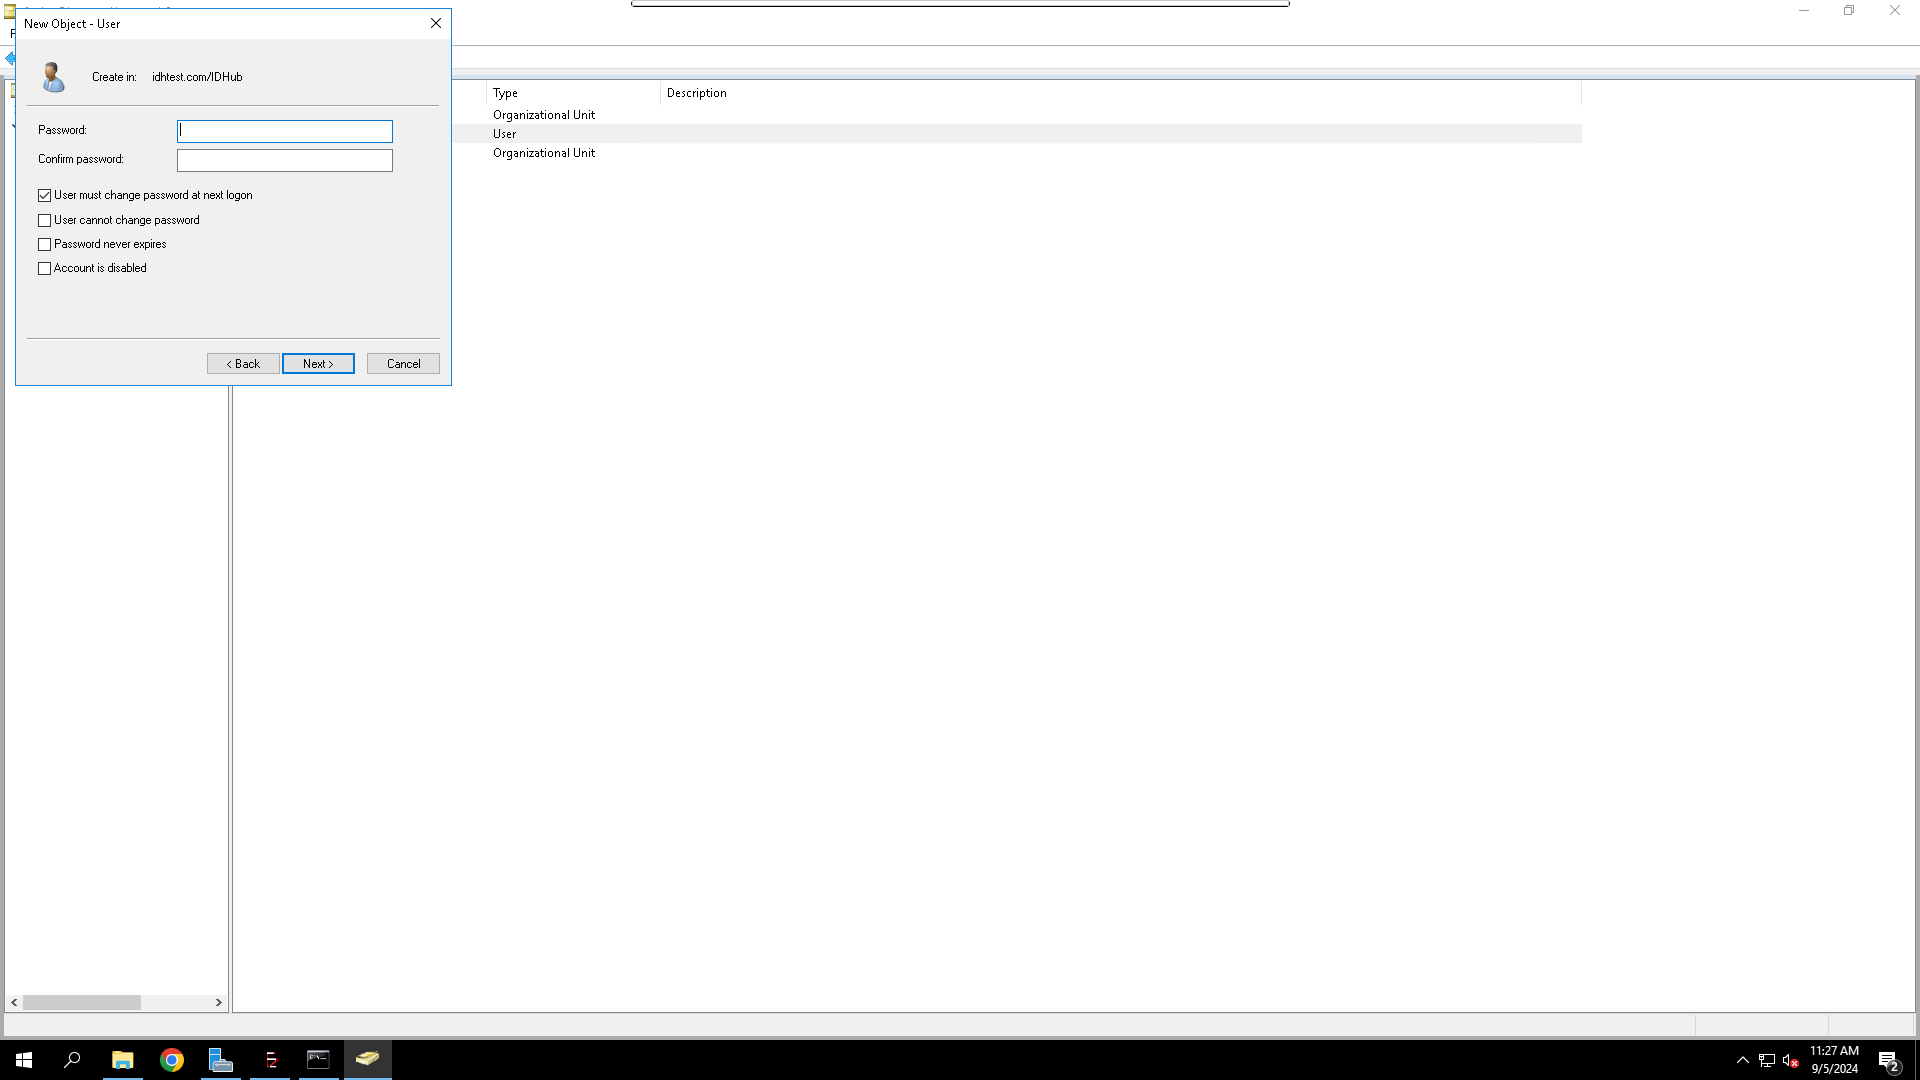
5. Complete the User Account Creation
- Review the details and click Finish.
Finding the Application Credentials
Step 1: Open Active Directory Users and Computers
- Press
Win + R, typedsa.msc, and press Enter. - Alternatively, you can go to Control Panel > Administrative Tools > Active Directory Users and Computers.
Step 2: Identify the baseDN (Base Distinguished Name)
The baseDN is the Distinguished Name (DN) of the root or starting point in the AD hierarchy where the service (IDHub) will begin searching for users and groups.
- In the Active Directory Users and Computers console, locate the domain root or a specific OU (Organizational Unit) where your users and groups are stored.
- Right-click on the domain or OU (e.g.,
OU=Users, DC=example, DC=com) and select Properties. - Go to the Attribute Editor tab:
- If you do not see the Attribute Editor tab, ensure you have enabled Advanced Features:
- Click on View in the menu bar and select Advanced Features.
- In the Attribute Editor tab, scroll down to find the
distinguishedNameattribute. - This attribute displays the full Distinguished Name of the selected domain or OU, which will serve as the baseDN.
- If you do not see the Attribute Editor tab, ensure you have enabled Advanced Features:
- Copy the Value: Right-click on the
distinguishedNameattribute and copy its value (e.g.,OU=Users,DC=example,DC=com).
Step 3: Identify the Search Base
The Search Base is usually the same as the baseDN but can be more specific if you want IDHub to start searching from a particular point within the baseDN.
- Navigate through the AD hierarchy to find a specific OU or container where user and group information is stored and relevant for IDHub.
- Follow the same process as above to get the DN of the specific OU:
- Right-click on the desired OU and select Properties.
- Go to the Attribute Editor tab, and find the
distinguishedNameattribute.
- Copy the Value: This will be the Search Base (e.g.,
OU=ServiceAccounts,OU=Users,DC=example,DC=com).
Step 4: Identify the Host (Domain Controller Hostname or IP Address)
The Host is the hostname or IP address of your Active Directory Domain Controller (DC) that IDHub will connect to for directory services.
Method 1: Using Command Prompt
- Open Command Prompt as an Administrator.
- Use the "nltest" command to find domain controllers:
- Type the following command and press Enter
- Replace "domain_name" with your Active Directory domain name (e.g., company.local).
nltest /dclist:domain_name
- Analyze the output:
- You'll see a list of domain controllers with their hostnames and IP addresses.
- The first DC listed is typically the Primary Domain Controller (PDC) Emulator.
- Verify the PDC Emulator role:
- To confirm which DC holds the PDC Emulator role, run
netdom query fsmo
- Look for the "PDC" entry in the results.
- Ping the chosen domain controller:
- Use the ping command to ensure connectivity:
ping hostname_or_ip
- Perform a reverse DNS lookup:
- To get the fully qualified domain name (FQDN), use
nslookup ip_address
Method 2: Using PowerShell
- Open PowerShell as an Administrator.
- Run the following command to list domain controllers
Get-ADDomainController -Filter * | Select-Object Name, IPv4Address
- This command lists all domain controllers along with their names and IP addresses.
- Choose a domain controller's FQDN or IP address as the Host.
Step 5: Verify Connection to the Host
- Use the
pingcommand or an LDAP connection test (e.g., usingLDP.exeorTest-Connectionin PowerShell) to verify connectivity to the chosen domain controller. - Ensure that the domain controller is reachable from the IDHub server and that firewall rules allow communication on necessary ports (typically port 389 for LDAP and 636 for LDAPS).
Step 6: Username/LDAP Directory Password
This is the username and password of the service account that you have created for AD (as discussed above)
Step 7: Port and WinRMHost
For typical Non-SSL connections you can use port 389 and for SSL secured connections you can use 636. WinRMHost is the same as host (as discussed above)
Permissions and Membership
Service Account Group Membership
For IDHub to manage certain AD groups and perform specific functions securely and efficiently, the service account must be placed in the correct AD groups. The groups we will explore in detail are the Administrators, Domain Admins, and Enterprise Admins groups. Understanding the roles and permissions associated with these groups helps ensure service accounts have appropriate access levels without introducing unnecessary security risks.
Administrators Group
Purpose and Scope: The Administrators group in Active Directory includes users who have full control over all domain resources. This group is intended for individuals or accounts that need extensive administrative privileges within a particular domain. Members of this group can manage nearly all AD objects, configurations, and settings.
Manageable AD Objects/Resources:
Members of the Administrators group can:
- Manage all aspects of the domain controller
- Manage Security Policies
- Manage System Services
- Add workstations to the domain
- Create and manage users and groups
- Manage Group Policies
This group has broad access, which is necessary for managing day-to-day operations of AD resources. However, it is domain-specific, meaning its permissions are limited to the domain in which the group resides.
Domain Admins Group
Purpose and Scope: The Domain Admins group is a high-level administrative group that has full administrative control over all aspects of a domain. Members of this group have even more elevated privileges than those in the Administrators group, particularly concerning domain controllers and domain-wide operations.
Because of the extensive privileges associated with this group, adding service accounts here should be done cautiously and only when absolutely necessary.
Manageable AD Objects/Resources:
Members of the Administrators group can:
- Manage all aspects of the domain
- Add workstations to the domain
- Create and manage users and groups
- Manage domain controllers
- Manage Group Policies
- Manage Domain-wide configuration
- Manage other privileged groups
- They have control over the membership of other high-privilege groups like Account Operators, and Server Operators.
Domain Admins automatically become part of the local Administrators group on every machine joined to the domain, giving them local administrative access on every domain-joined computer.
Enterprise Admins Group
Purpose and Scope: The Enterprise Admins group is a forest-level group that has full administrative access across all domains in an AD forest. This group is responsible for tasks that span multiple domains, such as creating or managing new domains and domain trusts.
Manageable AD Objects/Resources:
Members of the Enterprise Admins group can:
- Manage Domain
- Manage domain trusts
- Manage Cross-domain resources
- Add domains to the forest
- Manage schema modifications and configuration partitions
- Manage Global AD configuration
- Enterprise Admins should generally be reserved for accounts who need to manage forest-level tasks, such as setting up new domains or maintaining the overall health of the AD forest.
- This group has the highest level of privilege within an AD forest, so its membership should be tightly controlled.
For further information and details regarding the AD groups, please check the official Microsoft documentation below:
- https://learn.microsoft.com/en-us/windows-server/identity/ad-ds/manage/understand-security-groups#enterprise-admins
- https://learn.microsoft.com/en-us/windows-server/identity/ad-ds/manage/understand-security-groups#domain-admins
- https://learn.microsoft.com/en-us/windows-server/identity/ad-ds/manage/understand-security-groups#administrators
Service Account Permissions
Service account minimum permissions needed are the following
- Account Operators
- Domain user (default)
- Remote Management Users
- You would need to add the
ADSyncOperatorspermission to the service account, if you want the AD Sync feature of the connector. - If you do not need the AD sync feature, then make sure that the AD Sync feature is disabled in the schema. Following should be in the account schema of the connector
"adSync":
{
"OnUpsert": false,
"OnDelete": false
}
Click here to know more about this feature.
Common Granular Permissions
| Permission | Use-Case | Implementation |
|---|---|---|
| Read | Allows the service account to read specific attributes or objects in Active Directory. This is commonly used when the service needs to query user information (e.g., listing user accounts for authentication or provisioning purposes). | Apply on specific OUs, groups, or user accounts where read access is required. |
| Write | Allows the service account to modify attributes of objects. For example, updating user attributes like email, phone numbers, or department details. | Use carefully and restrict to only the necessary attributes to minimize security risks. |
| Create/Delete objects | Enables the service account to create or delete objects in Active Directory, such as creating new user accounts or removing obsolete accounts. This is often used by services that manage user lifecycles. | Delegate these permissions specifically to the OUs where objects will be created or deleted, ensuring they are not overly broad. |
| Modify Permissions | Allows the service account to change the permissions of objects in Active Directory, typically required if the service account needs to dynamically adjust access controls based on changing requirements. | Use with caution; modify permissions only on objects or attributes that require dynamic permission changes. |
| Change permissions | Required when the service account needs to adjust the access permissions of AD objects to maintain compliance or enforce security policies. | Use sparingly and only when necessary. Restrict to specific OUs or attributes to reduce risk. |
| Full Control | Provides complete control over objects, including all read, write, create, delete, and permission modifications. This is generally not recommended due to the high level of access unless absolutely necessary for service operations. | Apply only to very specific OUs or objects and after careful consideration of the security implications. |
Detailed Use Cases
| Use-Case | Description | Configuration | Required Permissions |
|---|---|---|---|
| User Provisioning | For IDHub to handle user provisioning, the service account would need to create user objects, set attributes (e.g., username, email) | Delegate these permissions on the specific OU where new users will be created. | Read, Write, Create objects |
| User Profile Management | For IDHub, it allows the service account to update user profile information as part of user management workflows. | Granular write permissions can be applied only to specific attributes rather than full user object write access. | Read, Write specific attributes (e.g., phone number, department) |
| Group Membership Management | The service account manages group memberships by adding or removing users from groups. This is crucial for role-based access control. | Apply write permissions specifically to group membership attributes to avoid granting full object write permissions. | Read, Write on Group Membership |
| Auditing | If the service account is used for monitoring or auditing purposes, it should have read-only access to relevant data. | Grant read permissions on the necessary objects and ensure that write permissions are not applied. | Read access to logs and user attributes |
| Deleted Administration | For delegated administration, service accounts can be given specific permissions to perform administrative tasks without full administrative rights. | Use the Delegation of Control Wizard to assign specific permissions like modifying group memberships, resetting passwords, or managing certain user attributes. | Custom set based on specific administrative tasks |
- Principle of Least Privilege: Always assign the minimal permissions required for the service account to perform its functions.
- Segregation of Duties: Avoid combining permissions that could lead to unintended escalations of privilege.
- Regular Review: Periodically review permissions and group memberships to ensure they are still appropriate and necessary.
- Auditing and Monitoring: Enable logging and auditing of service account activities to detect any unauthorized actions or anomalies.
How To Add Permissions
By default, user accounts that belong to the Account Operators group can manage only user and group objects. To manage organizational units or custom object classes, you must assign the necessary permissions to the service account. In other words, you must delegate complete control for an organizational unit or custom object class to a user or group object. In addition, you need these permissions to successfully perform provisioning of custom object classes. This is achieved by using the Delegation of Control Wizard
- You must have administrative privileges in Active Directory to delegate permissions.
- The service account should already be created in the appropriate Organizational Unit (OU).
Step 1: Open Active Directory Users and Computers
- Press
Win + R, typedsa.msc, and press Enter. - Alternatively, go to Control Panel > Administrative Tools > Active Directory Users and Computers.
Step 2: Navigate to the Organizational Unit (OU)
- In the Active Directory Users and Computers console, locate and expand the domain tree.
- Navigate to the OU where the service account requires permissions (e.g.,
Users,Groups,Service Accounts, etc.).
If you want to delegate control for all organization units under the root context, then delegate control at the root context level.
Step 3: Open the Delegation of Control Wizard
- Right-click on the target OU and select Delegate Control.
- This will launch the Delegation of Control Wizard, which allows you to specify permissions.
In a parent-child deployment environment or forest topology, perform this procedure on all the child domains.
Step 4: Add the Service Account
- In the wizard, click Next to start.
- Click Add to select the service account.

- In the "Select Users, Computers, or Groups" dialog, enter the name of the service account (e.g.,
svc_idhub), click Check Names, and then click OK. - Click Next to proceed.
Step 5: Choose Tasks to Delegate
On the "Tasks to Delegate" page, you have two options:
- Common tasks: For basic permissions like resetting passwords or modifying group membership.
- Custom task to delegate: For more granular and specific permissions.
Option 1: Delegate Common Tasks
- Select from common tasks such as:
- Reset user passwords and force password change at next logon.
- Read all user information.
- Create, delete, and manage user accounts.
- Modify the membership of a group.
- Select the appropriate tasks, then click Next.
- Review the permissions summary and click Finish to apply the changes.
Option 2: Delegate Custom Tasks
- Select Create a custom task to delegate, then click Next.
- Choose whether to delegate permissions to this folder, specific object types within the folder, or specific objects (e.g., user objects).
- Select Only the following objects in the folder, and choose the specific object types (e.g.,
User objects,Group objects), then click Next. - Specify the permissions you wish to delegate by checking the appropriate boxes under Permissions:
- Read: Select permissions like
Read All Propertiesfor viewing attributes. - Write: Select specific write permissions for attributes (e.g.,
Write phone number,Write department). - Create/Delete: Select
Create User objects,Delete User objects, or other relevant create/delete permissions. - Reset Password: Select
Reset Passwordif needed for password management tasks. - Modify Permissions: Select
Modify Permissionsif the service account needs to alter access controls. - Full Control: Use only if the service account needs unrestricted access, and with extreme caution.
- Read: Select permissions like
- Click Next and then Finish to complete the delegation.
Step 6: Verify Permissions
- Right-click on the OU and select Properties.
- Go to the Security tab and click Advanced.
- Locate the service account (
svc_idhub) in the list, select it, and click Edit to review the permissions. - Verify that the permissions match the requirements set during the delegation process.
Step 7: Fine-Tuning Permissions (Optional)
- If you need to adjust specific permissions, use the Advanced Security Settings:
- Click on the Permissions tab and then Add or Edit.
- Choose the service account and adjust permissions as needed.
- Use the Apply to drop-down to specify whether the permissions apply to this object, child objects, or both.
Step 8: Test and Validate the Permissions
- Log in or impersonate the service account to verify it has the correct access and can perform the necessary actions without over-permissioning.
- Check logs or perform specific actions such as reading attributes, creating objects, or resetting passwords to ensure permissions work as expected.
Immediate execution of AD-Entra ID sync
If you need immediate execution of AD-Entra ID sync, then follow the steps:
- Enable WinRM
- Enable inbound connection to port 5985
- Enable basic authentication and unencrypted communication for Powershell sync command execution (sync command encryption is not necessary). Commands below:
winrm set winrm/config/service/Auth '@{Basic="true"}'
winrm set winrm/config/service '@{AllowUnencrypted="true"}'