Disable User Feature
What is Disable User Feature?
This feature of IDHub allows customers to disable users in their tenant. Disabling a user means changing their status from ‘active’ to ‘disabled’. Refer to the table below for details on the effects of a disabled user across various sections of IDHub.
| Category | Effect of Disabling a User |
|---|---|
| Active Requests | Active Requests are automatically completed with the resolution “cancelled”. |
| Cart Request | The disabled user is removed from the cart. |
| Proxy Users | The disabled user will be removed from the "My Proxies" section. If the user is already a proxy for another user, that will also be removed. The disabled user can no longer be added as a proxy. |
| Certification | The disabled user will no longer be visible in the certificate definition. Certify or revoke actions for a disabled user in a certification task will be processed as per the workflow of the resource. If the certifier user is disabled, then the certification task will go to the alternate certifier and vice-versa. |
| Tasks | Individual open tasks for the disabled user are automatically reassigned to the user's manager. Group open tasks are auto-released if claimed by the disabled user. |
| Roles | Active roles for the disabled user remain unchanged. |
| Direct Report & Owner | If the disabled user had direct reports, the new manager will receive updates and tasks for those users. The owner of the disabled user will be updated with the new owner. |
| Saved Lists | If a saved list exists for items added to the cart, and the disabled user is the beneficiary, IDHub will remove the disabled user from the saved lists. |
- If the certifier and alternate certifier of a certificate definition are both disabled, IDHub will automatically remove any open certification task. The active certification request will then be marked as completed with the resolution ‘cancelled’.
- In account reconciliation for a trusted connected application, IDHub will create a new account for the user if a matching user exists in the target system, even if the account is disabled in IDHub. Updates to entitlements such as removing existing entitlements or adding new ones will also occur during account reconciliation, regardless of the account's disabled status in IDHub.
- IDHub doesn’t automatically revoke the role for the disabled user. However, the role can be manually revoked by going to the user profile and creating a revoke request for the role.
How to Disable a User?
Disable User via Service Request
- Log in to your IDHub tenant.
- Go to the IDHub User App.
- Click on “Search”.
- Click on the “Services” tab.
- Add the “Disable/Enable User” Service request to the cart.
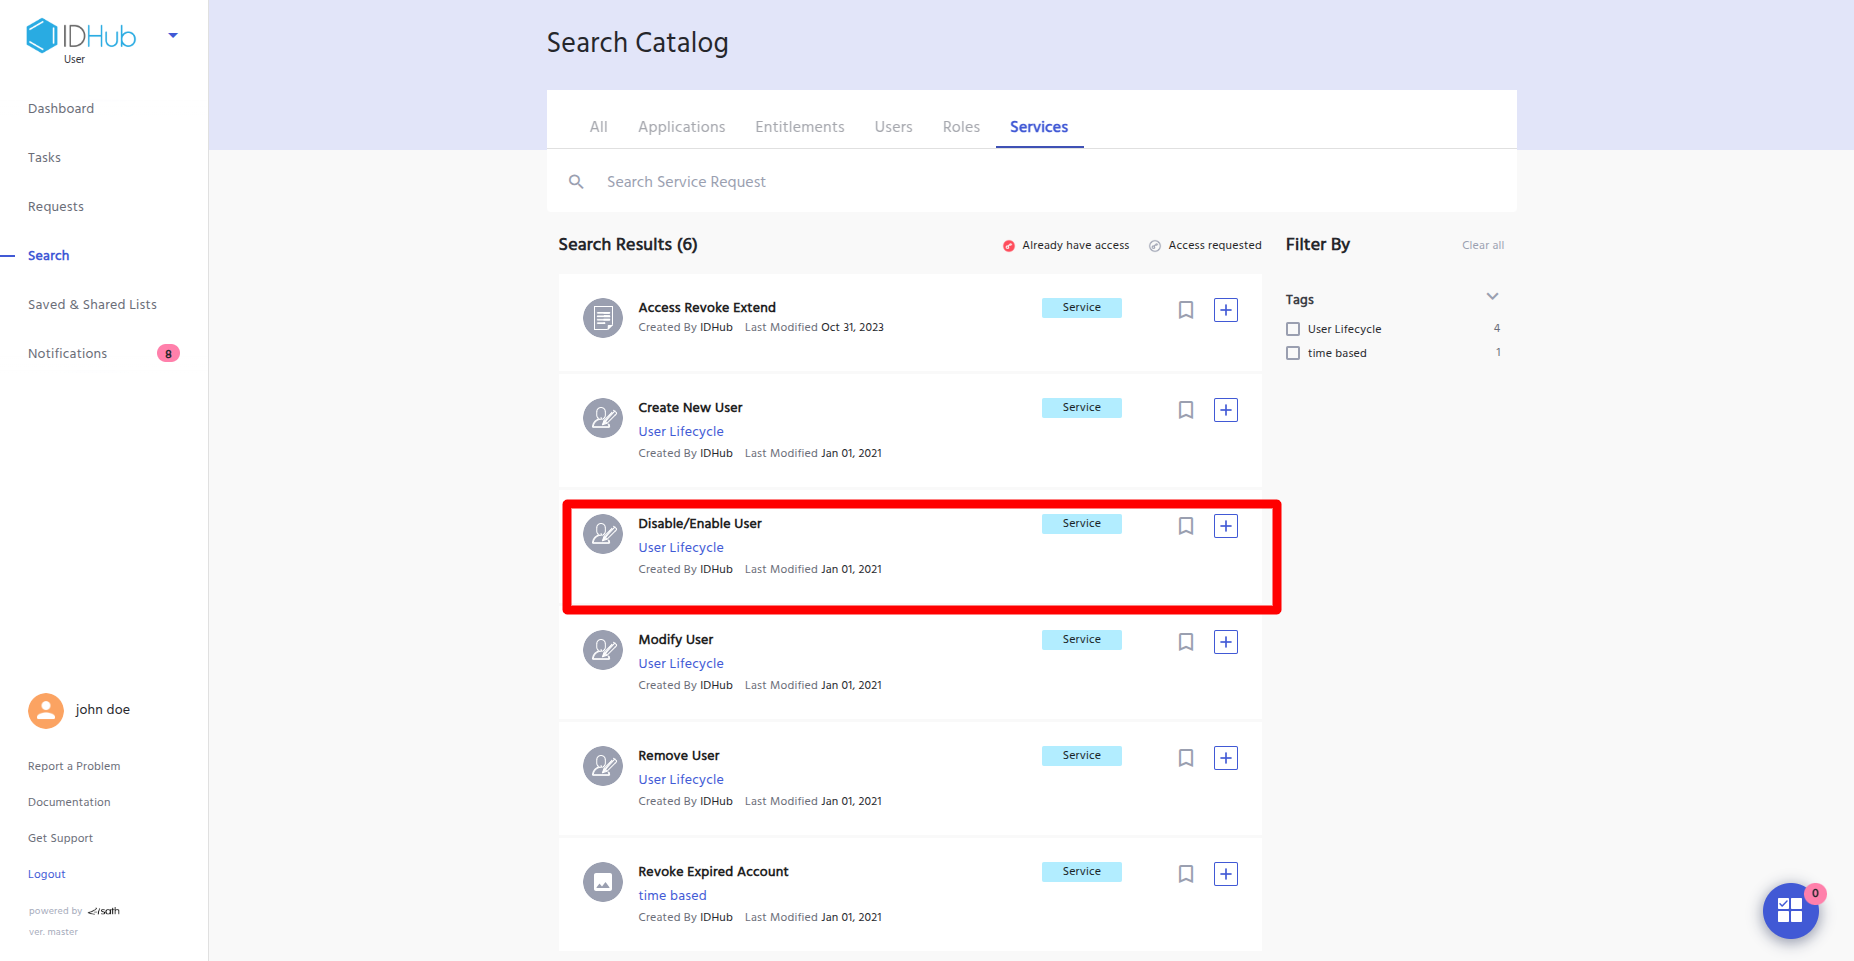
- Click on the “Proceed” button at the bottom.
- In the cart request page, add the user who you want to disable.

- Click on the “Continue” button at the bottom.
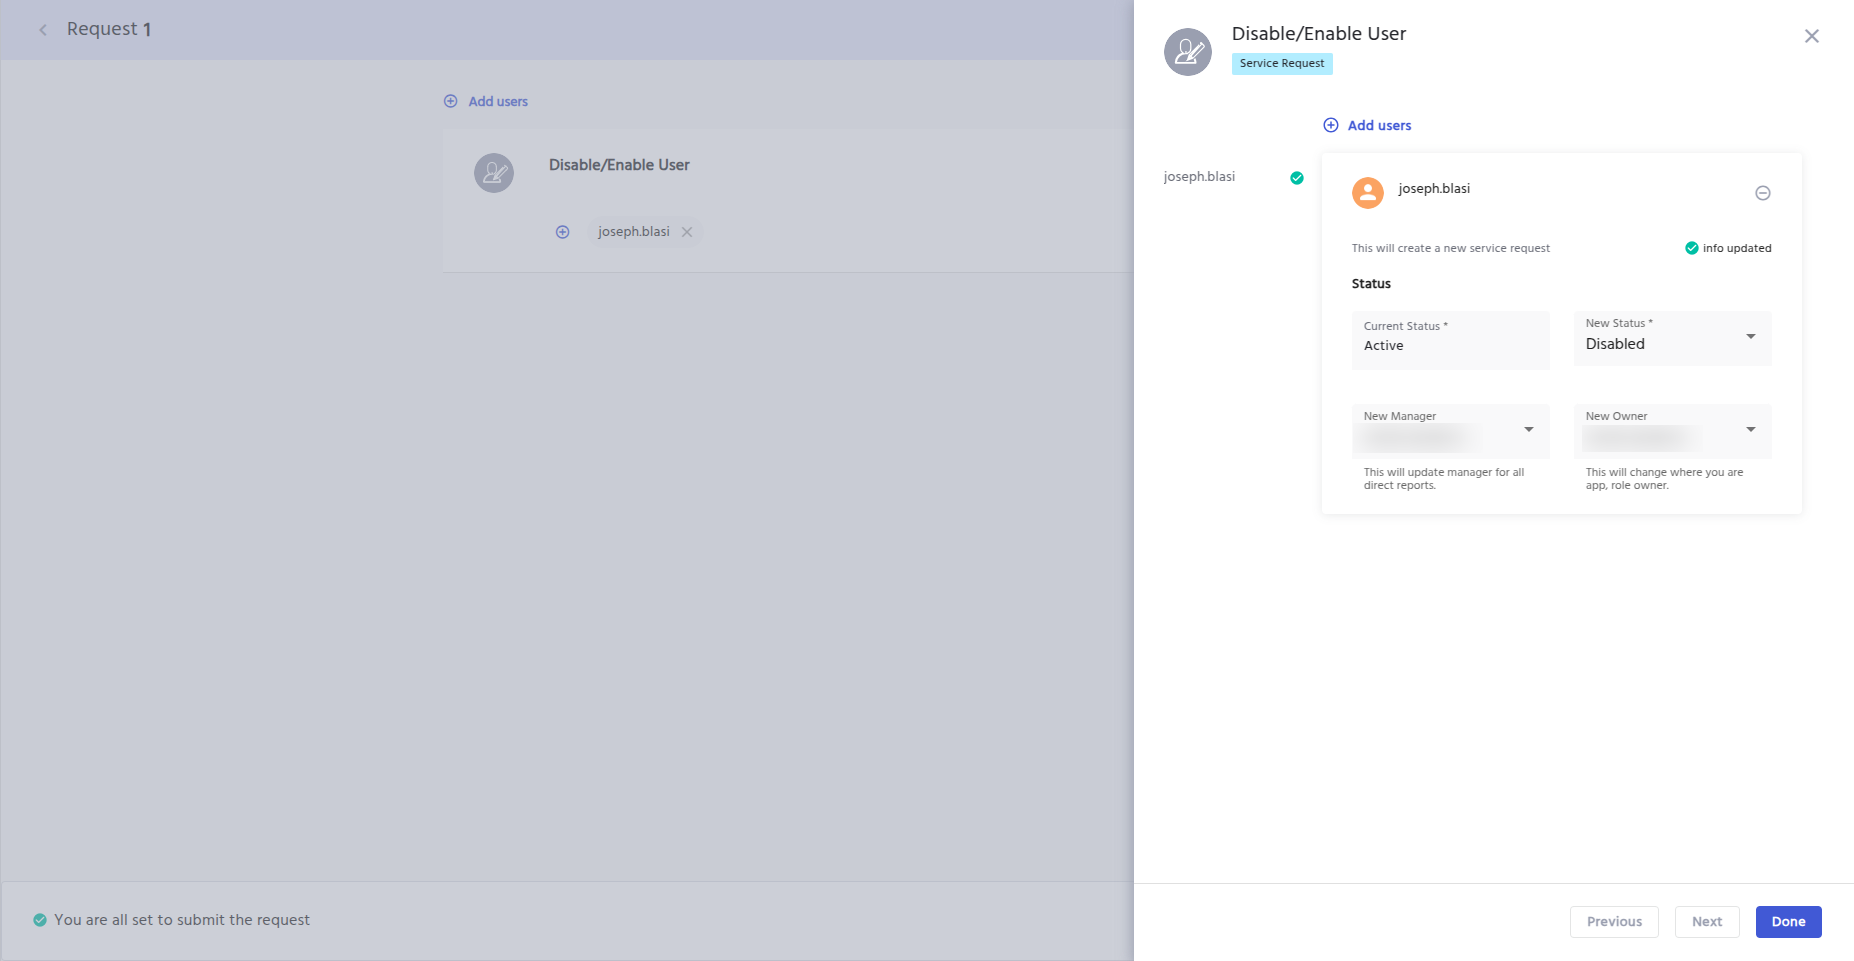
- On the next page, you will be shown a right-hand side panel where the new status and current status of the user will be shown.
- In this scenario, the current status is “Active”, and the new status you have to select is “Disabled”.
- Next, you will have to choose the new manager for the user, which will update the manager for all direct reports for the disabled user.
- Also, you will have to select the new owner, which will change the owner of the application/role ownership for the disabled user.
- After entering the above information, click on the “Done” button. And again click on the “Continue” button at the bottom.
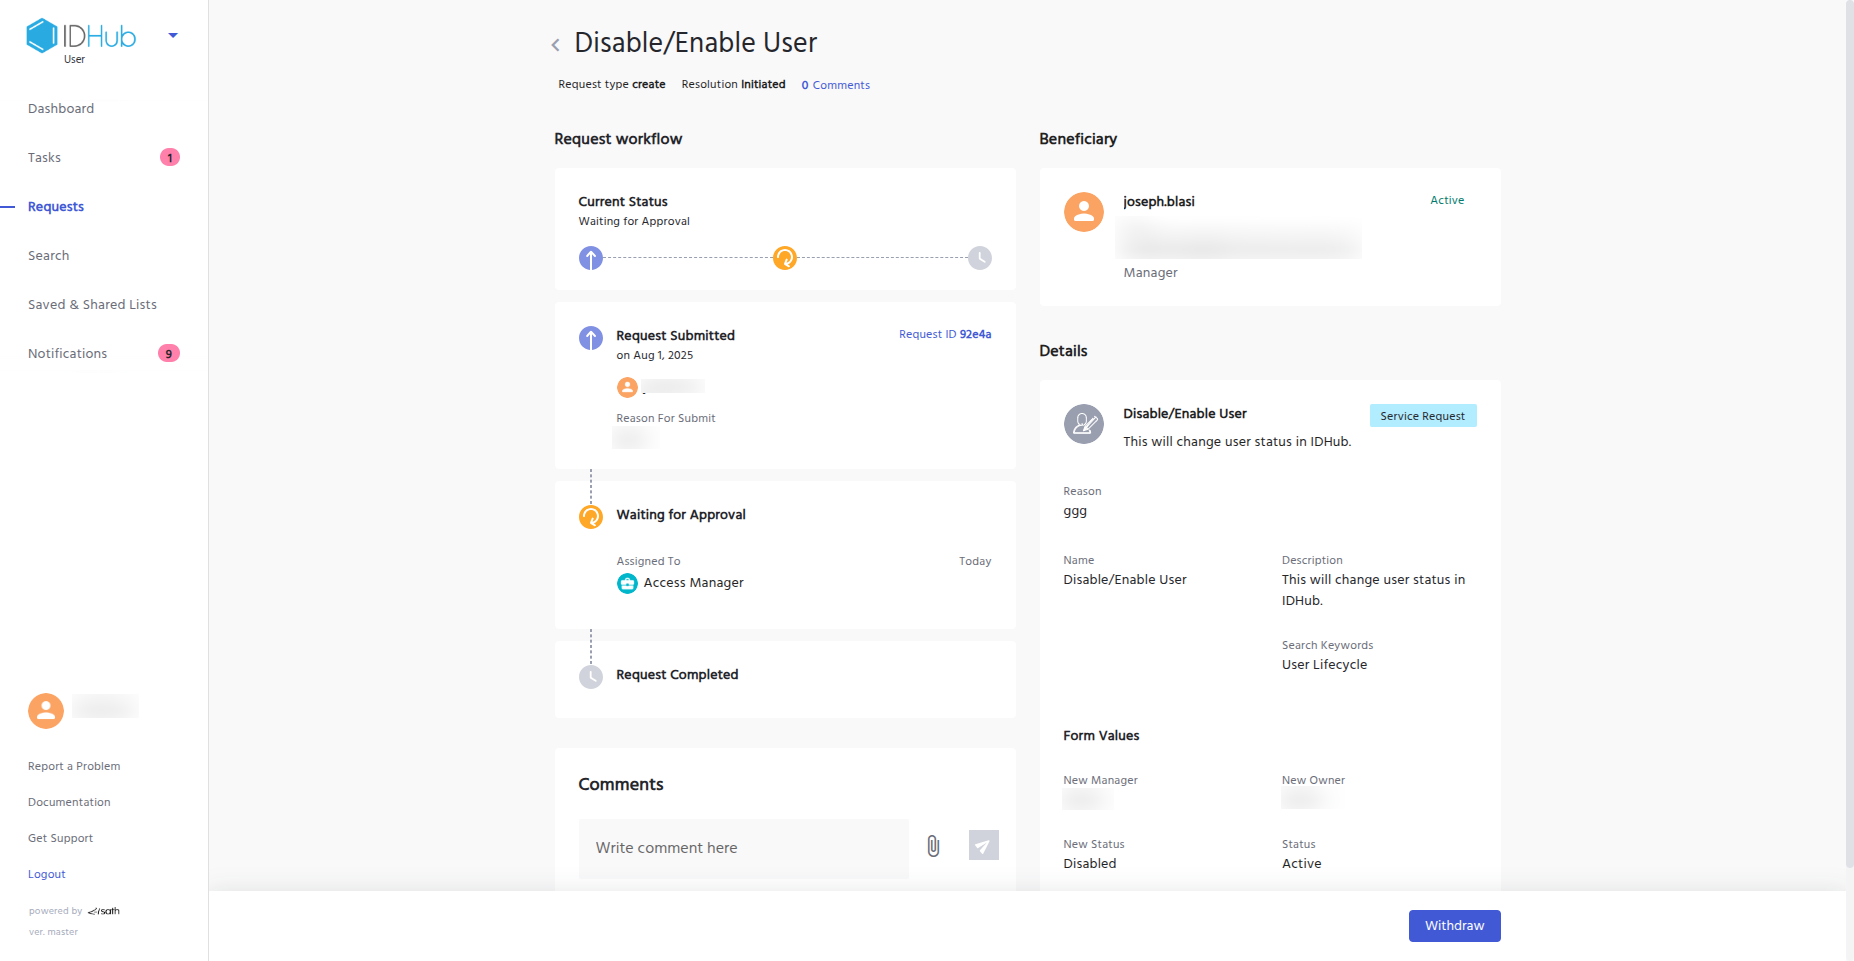
- Enter your justification for the request.
- Click on the “Submit” button to submit the request.
- The request will go to the access manager.
- Once the access manager claims and approves the request, the user will be disabled.
Disable User via KeyCloak
- Log in to your IDHub tenant.
- Go to the IDHub Admin App.
- Click on “Admin Settings”.
- Click on “SignOn”.
- Click on the “KeyCloak Administration” button.
- You will be taken to the KeyCloak Administration section.
- Click on “Users”.
- Click on the "Enabled" toggle to “Off”.
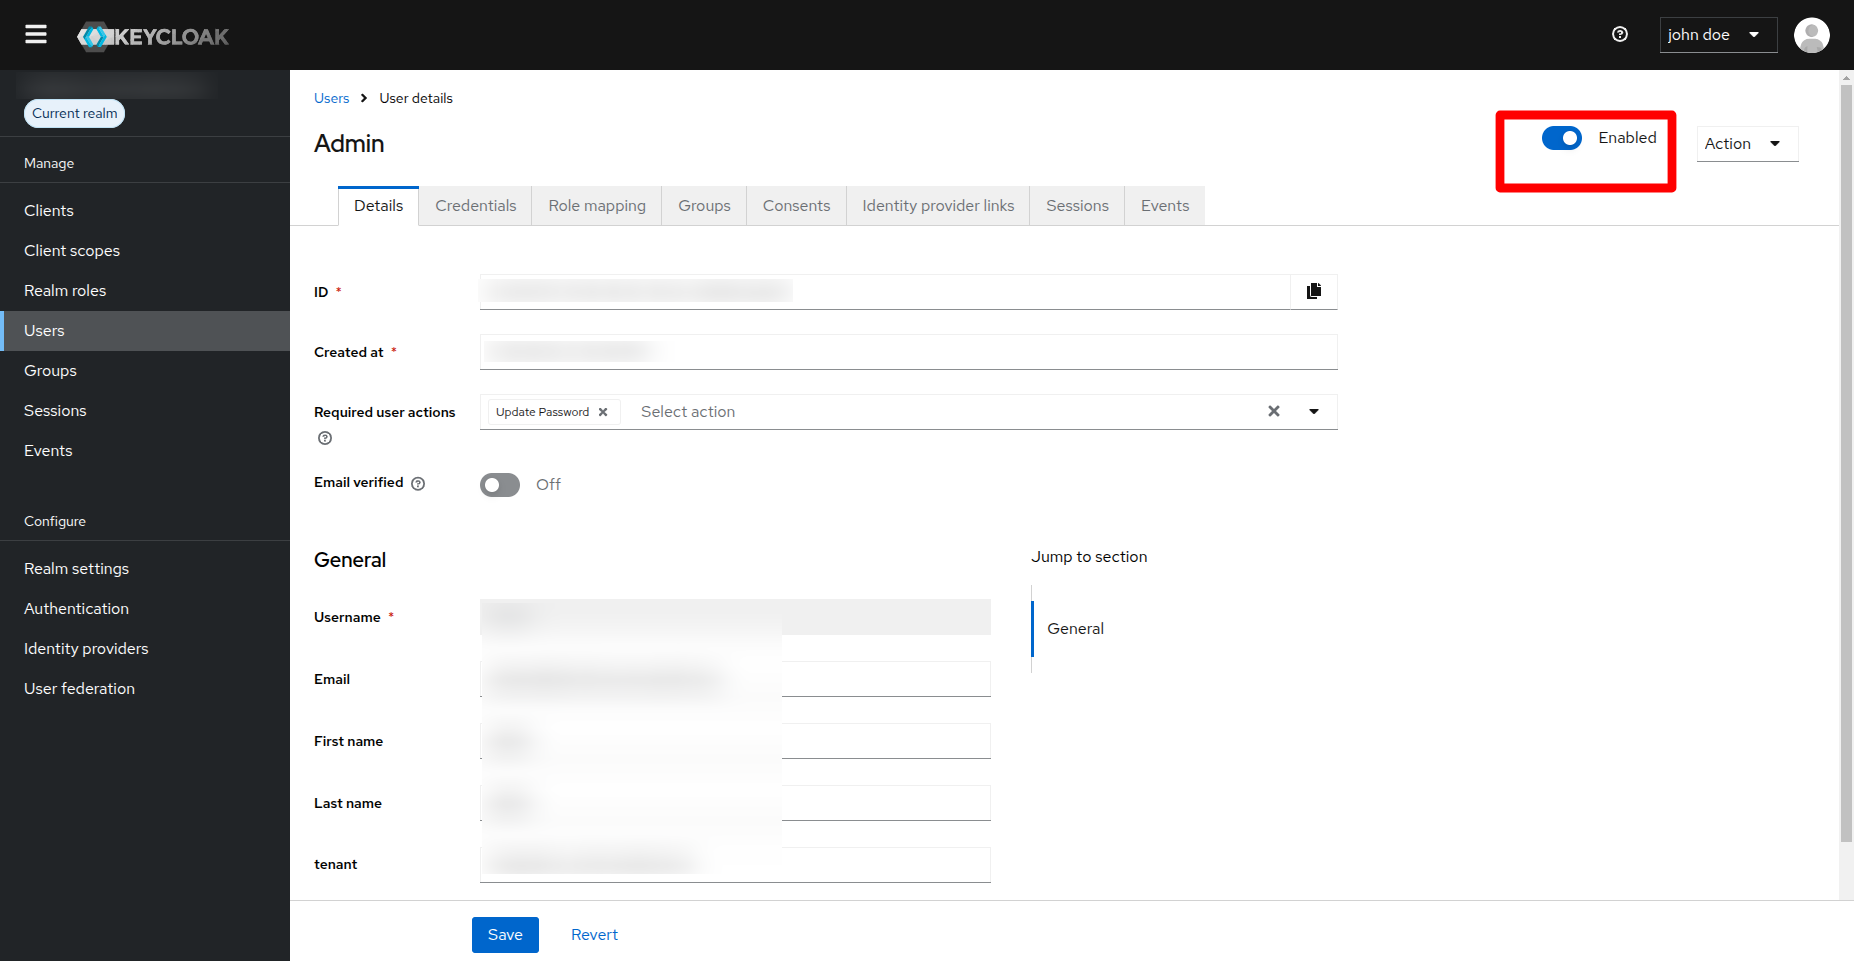
- You will be asked to confirm your action in a confirmation dialog box.
- Click on the “Disable” button in the dialog box in order to disable the user.
How to verify if a user is disabled?
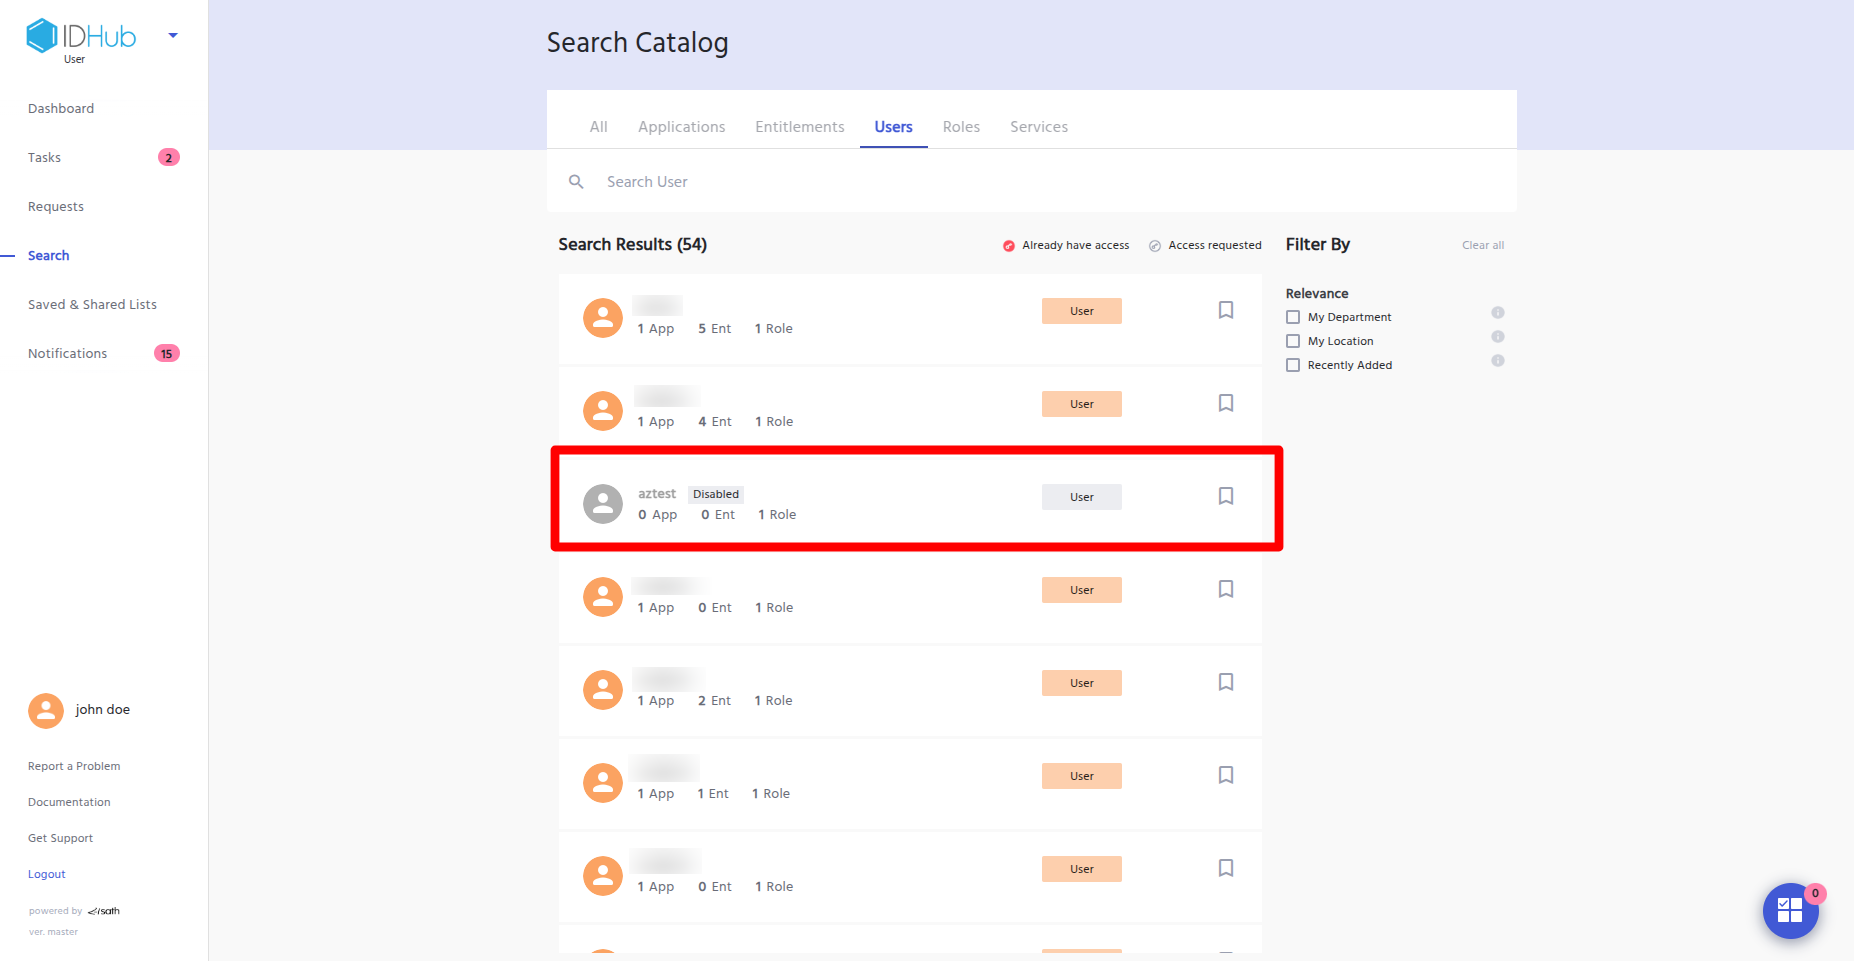
Via Search Catalog
- Log in to your IDHub tenant.
- Go to the IDHub User App.
- Click on “Search”.
- Click on the “Users” tab.
- The disabled user will be shown with a “Disabled” label in the search catalog.
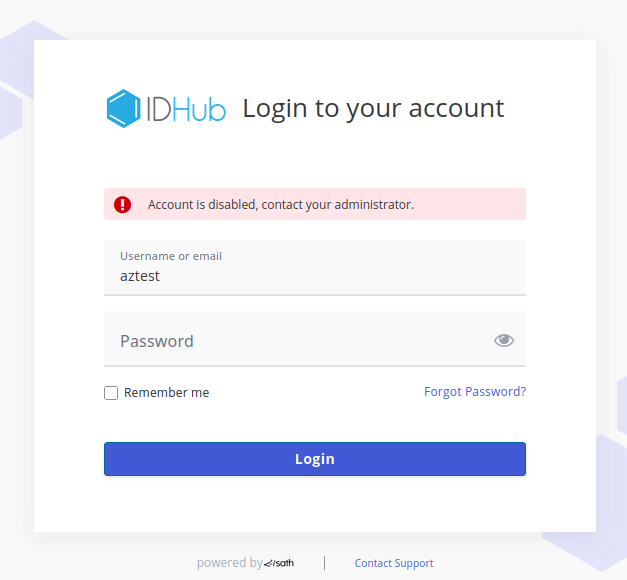
Via Tenant Login
- If the disabled user tries to log in to the IDHub tenant using their credentials, IDHub will not authenticate the login.
- It will show a login error with the message “Account is disabled, contact your administrator” (as shown in the screenshot below).
- If you do not provide the new owner while disabling the user, and if the user is already the owner of some applications or roles, the disable user request will fail.
- If you do not provide the new manager while disabling the user, and the user has direct reports, the disable user request will fail.
Disable User Account Action Configuration
By default, once a user is disabled, IDHub changes the account status to disabled for connected applications. This feature depends on the target system; if it allows status changes, IDHub will update the account status to disabled. In the case of a disconnected application, if there is a status field in the onboarding form, then IDHub will update that field when the user is disabled. However, the customer has the ability to change the default action and add three more configurable options to the Disable User action, which are as follows:
- Remove Accounts
- Remove Entitlement
- No Change
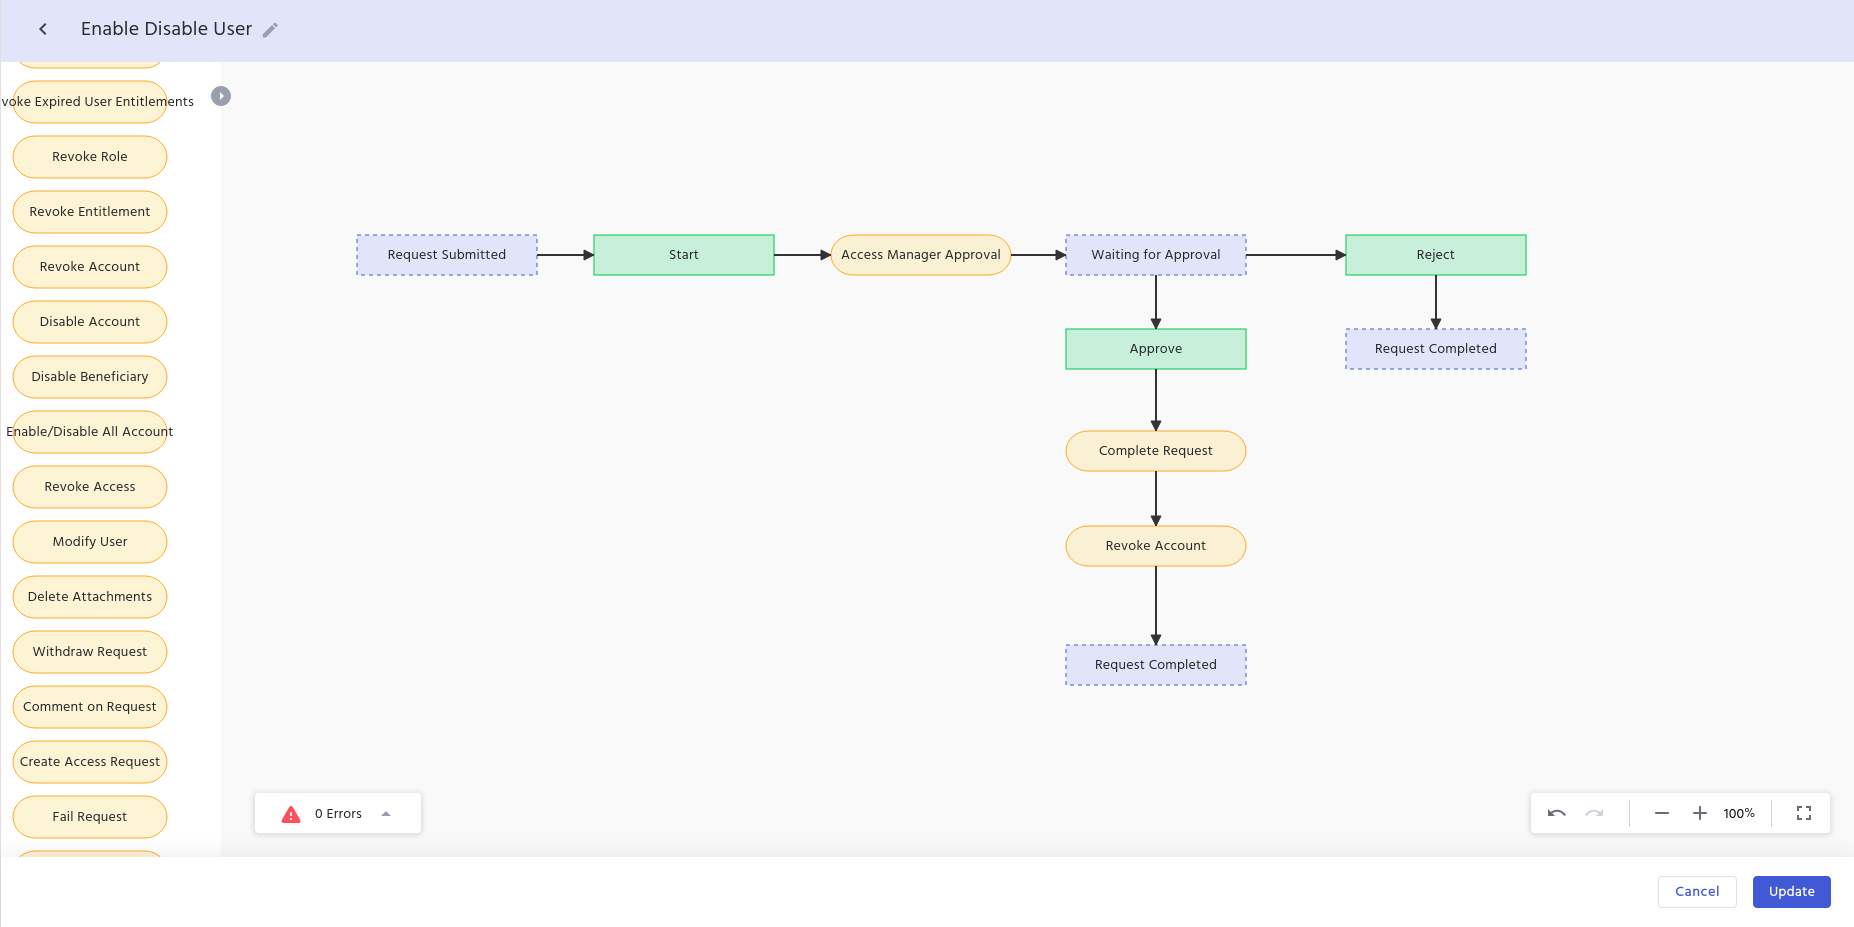
How to Configure Remove Accounts Action on Disable User?
- Log in to your IDHub tenant as an admin.
- Go to the IDHub Admin App.
- Click on “Workflows”.
- Click on the “Edit” icon for the “Disable / Enable User” workflow.
- First, you have to remove the default action; for this, delete the “Enable/Disable All Accounts” node from the workflow.
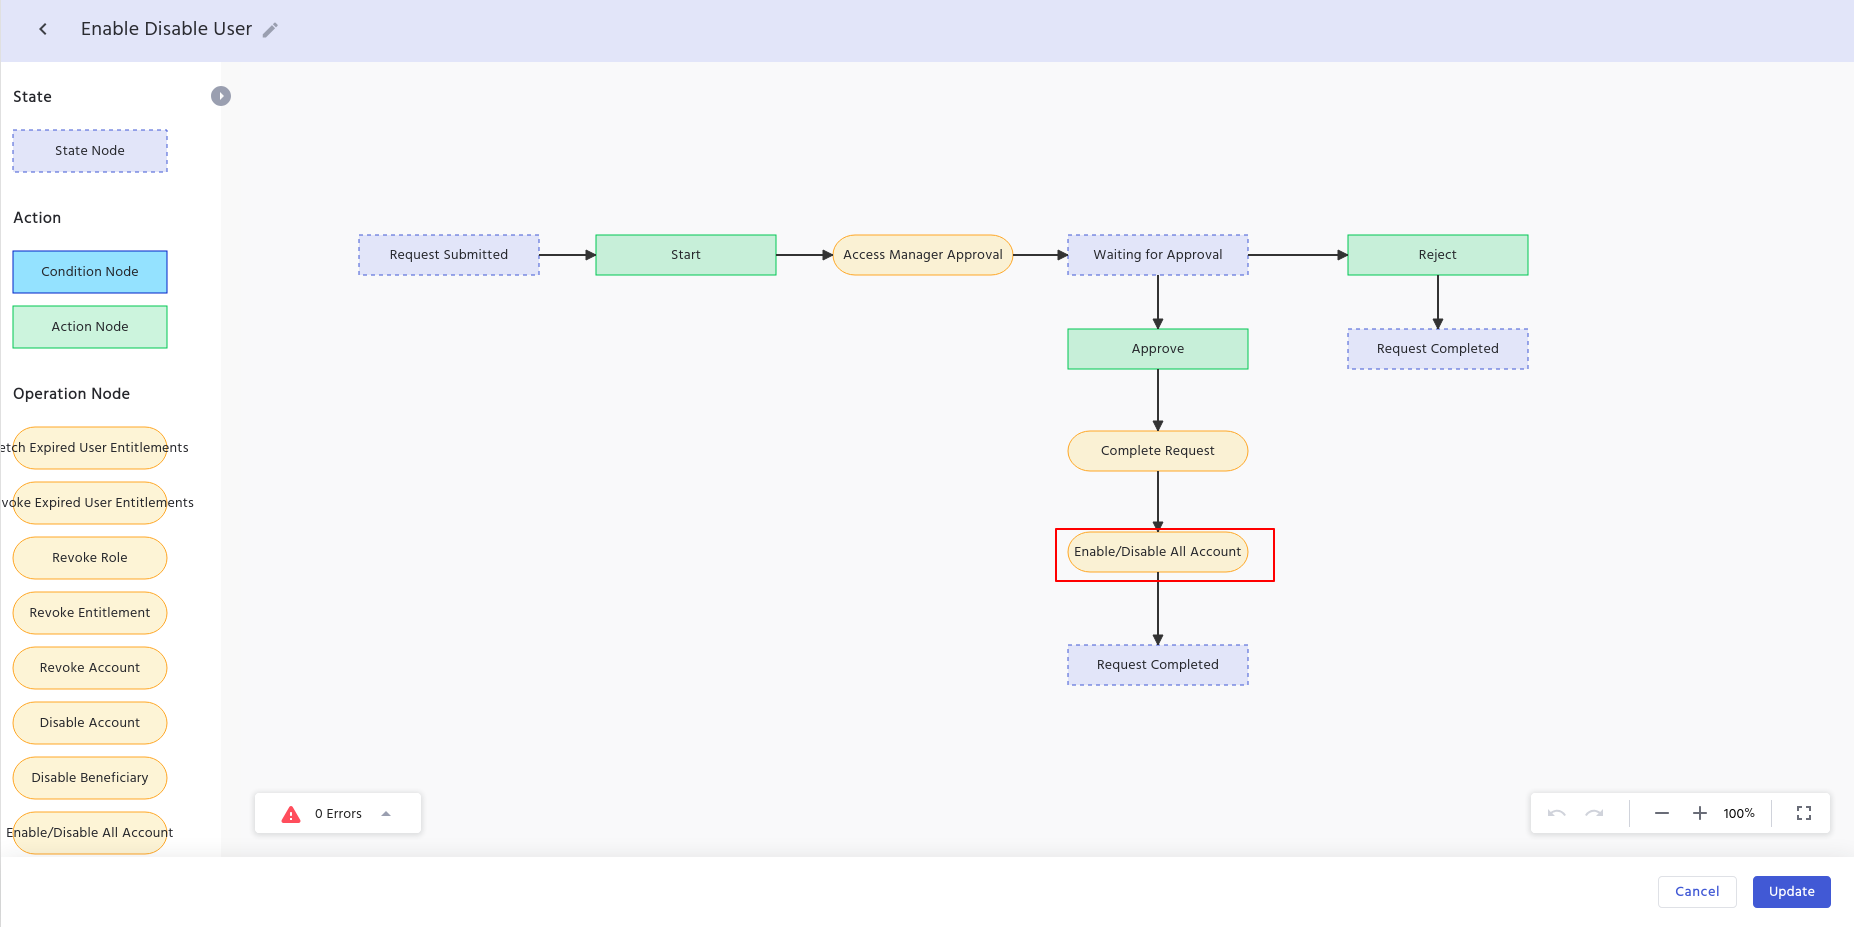
- Drag the “Revoke Account” node to the workflow editor.
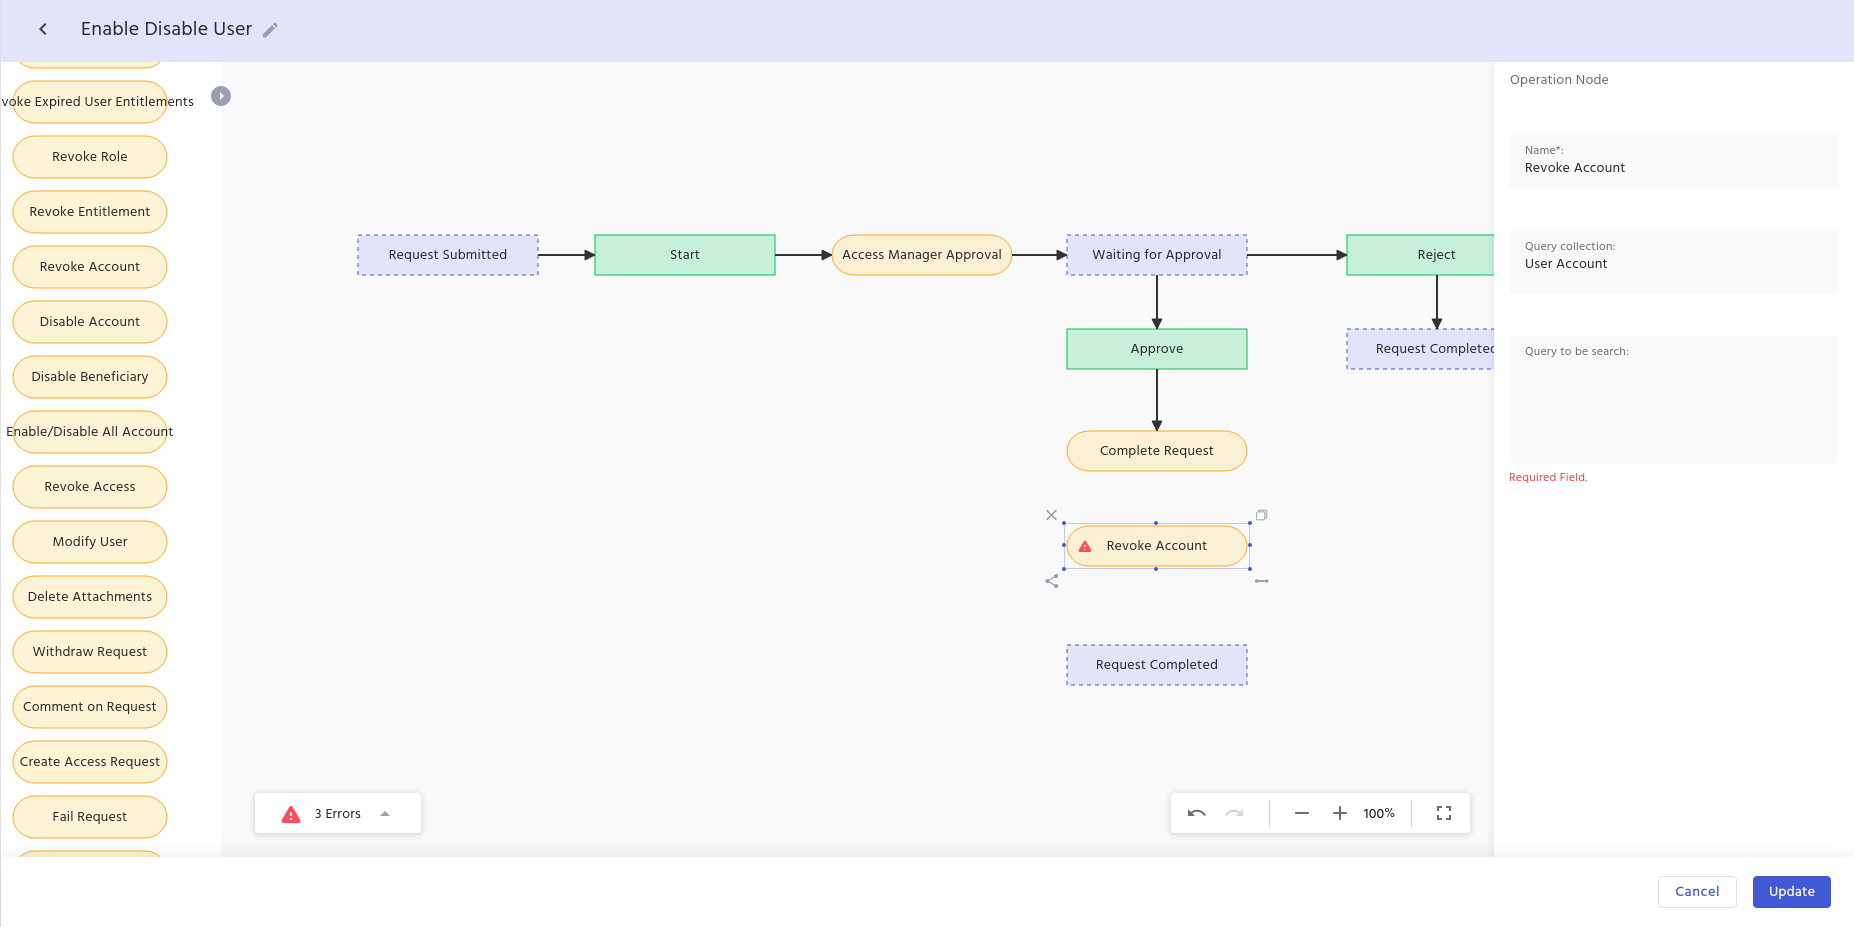
- Now, in the revoke account node, we have provided two query collections which are as follows:
- User Account
- Select this query collection if you want to revoke accounts based on the user account collection.
- Target System
- Select this query collection if you want to revoke accounts based on the target system.
- User Account
- In the query to be searched, you can enter any MongoDB-compatible query along with RegEx.
- Examples are given below:
- Example 1:
Collection: UserAccount{"status": {"$in": ["Provisioned", "De-Provisioning Failed"]}}- The above queries the user account collection and removes any account for the user which is either provisioned or is in De-provisioning status.
- Example 2:
Collection: "TargetSystem"{"integrationLevel": "Connected"}- The above queries the target system collection and removes any connected application for the user.
- Example 1:
- After making the above changes, connect the Revoke Account node with the complete request and request completed node.
- Click on the Update button at the bottom to confirm the changes and update the workflow.
How to Configure Remove Entitlements Action on Disable User?
- Log in to your IDHub tenant as an admin.
- Go to the IDHub Admin App.
- Click on “Workflows”.
- Click on the “Edit” icon for the “Disable / Enable User” workflow.
- First, you have to remove the default action; for this, delete the “Enable/Disable All Accounts” node from the workflow.
- Drag the “Revoke Entitlement” node to the workflow editor.
- Now, in the revoke entitlement node, we have provided two query collections which are as follows:
- Entitlement
- Select this query collection if you want to revoke entitlements based on the entitlement collection.
- Target System
- Select this query collection if you want to revoke entitlements based on the target system.
- Entitlement
- In the query to be searched, you can enter any MongoDB-compatible query along with RegEx.
- An example is given below:
- Example 1:
Collection: "Entitlement"Query: {"type": {"$in": ["Entra-Admin", "Entra-User"]}}- The above queries the entitlement collection and removes entitlements for the user whose type is one of the given list.
- Example 1:
- After making the above changes, connect the “Revoke Entitlement” node with the complete request and request completed node.
- Click on the Update button at the bottom to confirm the changes and update the workflow.
How to Configure No Change Action on Disable User?
- Log in to your IDHub tenant as an admin.
- Go to the IDHub Admin App.
- Click on “Workflows”.
- Click on the “Edit” icon for the “Disable / Enable User” workflow.
- In order to configure the no change action, delete the “Enable/Disable All Accounts” node from the workflow.
- After making the above changes, connect the complete request and request completed node.
- Click on the Update button at the bottom to confirm the changes and update the workflow.